Uncategorized

libnotify 0.4.5 and notification-daemon 0.4.0 released

It’s been a long time since I’ve really put out a libnotify or notification-daemon release. Review Board and VMware have taken up a lot of time the past year, so development has been slow, but I think these releases are worth it.

libnotify 0.4.5 [Release Notes] [Downloads]

This is mostly a small bug fix release, but introduces support for associating a notification with a GtkStatusIcon. This allows for better position tracking when notification icons are jumping around.

notification-daemon 0.4.0 [Release Notes] [Downloads]

This is a large feature and bug fix release. The major two features are multi-head support and a new control panel applet for specifying the notification theme and corner origin.

The multi-head support will show standard (non-positioned) notifications on the monitor the mouse is currently on. Previously, they would only appear on the primary head. This helps to notice new notifications, and fixes problems with some people who have a multi-head setup but only have one monitor on or in view. Also, notifications that appear on the edge of a monitor in a multi-head setup will no longer cross the monitor boundary, and will instead just stay on the correct monitor.

The new control panel applet makes it easy to switch notification themes or to specify which corner notifications should appear from. This will be expanded in the future.

As mentioned above with libnotify, notification-daemon can now track when status icons have moved so that the notifications are no longer in the wrong position during startup.

There’s a bunch of other nice little bug fixes that are mentioned in the release notes.

Thanks for the patience, everyone!

Racism, Sexism, and now Prop 8

I found out this evening, to my dismay, that my site was littered with “Yes On Prop 8” banners. Now, for those who live outside California and haven’t been following this, Prop 8 is a measure designed to introduce an amendment to the California constitution to ban gay marriage, basically ensuring that certain people would never have the same rights as others in this state.

Now I normally try to stay away from politics on my blog, but I want to talk about two points.

First, I don’t mind banners on my site that are designed to sell a product. People generally understand that an ad for an online web service or a product of some sort is not necessarily endorsed by the site it’s running on. Ads are everywhere and most people generally get that it’s provided by an ad service, and just ignore them.

What bothered me about the Yes On Prop 8 ads is that it felt as if I’m endorsing Prop 8. Somehow, it feels wrong to me. I’m not morally outraged about Sun Microsystems wanting to sell a server system or Microsoft wanting to sell an office suite. I am outraged about Prop 8. Products are fine to advertise on my site. Controversial freedom-limiting propositions I’m completely against are not.

I look back in our history and see that by and large, our generation is regretful of how we’ve mistreated people in the past. Shooting Native Americans used to be fine. Stripping away their rights and making them unequal was socially accepted. It was completely understood that if you’re black, you’re property. If you’re a women, you had no rights to vote and your opinion didn’t matter.

I like to think we’ve come a long way from that. People pride themselves on how we’re more mature now. Black, white, red, men, women. It doesn’t matter. This is the land of the free, the land of equality. So why is it that it’s still okay to discriminate against someone because their love of someone makes you feel uncomfortable?

It’s okay to not feel comfortable with gay marriage. A lot of people don’t. But do you feel more comfortable being part of a group of people that knowingly discriminated against another group, stripped them of certain rights that you yourself enjoy, simply because something you don’t have to deal with on a daily basis makes you feel uncomfortable to think about? Are you going to be okay with the thought of your grandkids or your great-grandkids feeling embarrassed because of how you voted, like how you feel about your great-grandparents’ racism? How much is preventing marriage for two people who love each other, in order to feel less uncomfortable, worth to you?

The Yes On Prop 8 advertisements often show the clip with the mayor of San Francisco saying “It’s going to happen, whether you like it or not!” It’s a good strategic clip for them to have chosen, as it can be interpreted as him saying “you have no say, we’re forcing gay marriage on all of you.”

I see it another way. I see gay marriage being inevitable not as an attack, but as the inevitable rise in tolerance that, over time, we’ve come to develop in this country. As a country, we don’t have the best track record of tolerance to new things, but we always mature in the end. This is not the last time we’ll face such mass intolerance and the limiting of rights of a group of people, just as this will not be the first time that we as a people will overcome our fears and begin to see us all as being equal.

So this is important. It’s not just about your level of comfort with those who live a different lifestyle. It’s about equality. It’s about overcoming personal fears. It’s about making an effort to keep this country on a path of freedom. Because if we start going back to our old ways of discrimination and fear, all we’re doing is regressing and limiting the rights of others out of some fear of the world spiraling into chaos. We’ve worked to abolish racism. We’ve worked to abolish sexism. The world is still here. We can do this again.

Vote no on Prop 8.

Random friend seeking on Google Talk?

Has anybody else noticed this?

Over the past several months, I’ve had a few people add me to their Google Talk account, claiming they want to make friends. The conversations start simple enough, asking basic “getting to know you” questions. Nothing seems too prying, and it certainly doesn’t seem like a bot. However, in each case, something doesn’t fully seem to add up, or maybe I’m just being paranoid. Either the person doesn’t remember how they found my address, or they claim they were just trying random addresses. Some people are from India, some from the US. However, they never seem to be able to find a picture when requested. They look and look but never manage to find one, and then suddenly have to go.

I’ve IM’d with a couple of them for a few days, a week, just to see if they were going to ask any questions indicating they were looking for specific information, but they haven’t really.

I’d feel bad if these were actually real people just “looking for a friend,” as they’ve said, but the fact that nobody can seem to give me a good reason for how they got my info concerns me, as does the behavior about a picture. Have other people seen this? Is it some new kind of weird spam/info gathering attempt? Or what?

Designing Unity: The Start Menu

Early on when we began to develop Unity for Workstation, we started to look at ways to give users access to the guest’s start menu. This seemed like an easy thing to solve at first. A month later we realized otherwise. We debated for some time and discussed the pros and cons of many approaches before settling on a design.

We had a number of technical and design restrictions we had to consider:

  • The UI should be roughly the same across Windows and Linux hosts.
  • Start menu contents must always be accessible regardless of the desktop environment on Linux.
  • Need to cleanly support start menus from many VMs at once.

Our chosen design

The design we settled on was to have a separate utility window for representing the start menu. This window can auto-hide and dock to any corner of the screen, or remain free-floating, and provides buttons for each VM. The buttons are color-coded to match the Unity window’s border and badge color. When you first go into Unity, the window briefly shows, indicating where it’s docked.

Unity Start Menu Integration

There are many advantages to this design.

  • You don’t have to re-learn how to use it between platforms or even desktop environments.
  • It’s pretty easy to get to and yet stays out of your way when you don’t need it.
  • All the start menus are easily accessible from one place.
  • The start menu buttons are color-coded to match the Unity windows.
  • Users can control whether the window is docked in a corner or free-floats on the desktop.
  • We have a lot of flexibility for feature expansion down the road.

Why not integrate with the Start Menu?

Since the first Workstation 6.5 beta, I’ve been asked why we chose the design we have instead of integrating the start menu into the notification area or into the existing Applications/Start menus. The idea to do so seems kind of obvious at first, but there are many reason we didn’t go that route.

Let’s start with the host’s Applications/Start menus. This seems the most natural place to put applications, as the user is already used to going there. We began going down this route, until we realized the problems associated:

  • On Linux, not everyone runs GNOME, KDE or another desktop environment with an applications menu supporting the .desktop spec correctly or at all. This means we’d be drastically limiting which desktop environments we could even represent applications in.
  • In the case of GNOME, it would add more clicks to get access to any application (Applications ? Virtual Machines ? VM Name ? Applications). This becomes tedious, quickly. Also, from my tests, adding entries three levels deep doesn’t always appear to work reliably across desktops.
  • In Windows, the situation is just as unclear. People tend to think that Windows only has one Start menu, but in reality, we’d have to support three (Classic, XP, and Vista). For quicker access, we’d need to add something to the root menu, and each of these start menus have slight differences in how we can do this. None of the solutions are even particularly good there, as entries may be hidden from the user to make room for other pinned applications.
  • In summary, where you go to access the start menu contents will be different not just on each OS, but across desktop environments and even different modes of the same environment (on Windows).

What about the notification area/system tray?

Another possibility that has been brought up is to use the notification area and to tie the start menu to an icon there. While this would generally work, it wouldn’t work too well.

  • On Linux, it’s frowned upon to put persistent entries in the notification area. A panel applet could work, but users would have to manually add it, and it would be GNOME or KDE-specific.
  • There’s no guarantee there even is a notification area or even a panel in Linux desktops.
  • On Windows, the icon may be automatically hidden in the system tray to make room for other icons.
  • The icon is such a small area to click on, making it annoying to launch applications quickly.
  • The icon is generally not too discoverable.

Tips and future improvements

While we’ll probably keep our current model, there are definitely improvements I’d personally like to make in some future release. One such possible example is to allow dragging an entry off onto the panel or desktop to create a shortcut/launcher. If you frequently access certain applications, you’d be able to put them wherever you want them for quick access. Clicking them while the VM is powered off would power the VM back on in the background and then run the application.

A lot of this exists already. While there is no automatic launcher creation, you can create your own that run:

vmware-unity-helper --run /path/to/vmx C:pathtoapplication parameters

This is not a supported feature at this time and may have bugs, but in the general case it should work just fine.

VMware Workstation 6.5 released!

I wanted to come up with some witty introduction here, but after a year of hard work on Workstation 6.5, I’m just too tired to come up with anything.

Workstation 6.5 is the latest release yet of our Workstation product, and continues in the fine tradition of being an awesome program. It’s also the first version to introduce Unity, a feature I’ve spent a lot of time on and will be blogging about in more detail soon.

So why should you upgrade to Workstation 6.5? Well, if you’re a Workstation 6.0 user, it’s free, which is a pretty good incentive. It also comes with a bunch of new and improved features.

Unity

Unity is a feature I’m particularly proud of, because it’s pretty much the only thing I worked on for Workstation 6.5.

Unity breaks down the walls between the host computer and the virtual machine. With the click of a button, application windows from the VM pop out onto the host desktop, allowing you to put your host and guest applications side-by-side. If you’re a Linux user but you need to use Outlook for work, this feature will let you just simply run Outlook alongside your other windows.

Unity isn’t just a Workstation feature on Linux or Windows. The free Player product can also run your VMs in Unity!

Unity works best with Windows guests right now but does support Linux guests as well. Linux guests are more experimental and I strongly recommend using a recent version of Metacity in the guest. For Linux hosts, you’ll have best results with Compiz, Metacity or KDE.

It’s a complicated feature and, while not perfect, is still pretty great. I’ve written a little about it (see Working outside the box with Unity and Workstation 6.5 Beta 1 – Now with 100% more Unity!).

In the coming weeks, I plan to write a small series of blog entries about the development of this feature, including some of the complications involved and design decisions we made.

Record/Replay

Workstation 6.0 introduced Interrupt Record and Replay, a feature enabling users to record on the CPU level everything that’s happening for a range of time in a virtual machine for later playback. This is a powerful feature for development and debugging, as one can record a session during the testing of an application and forever capture that annoying 1-in-100 crash.

Workstation 6.5 improves upon this by providing a much more flexible UI with the ability to skip around a recording, adding checkpoints for quick navigation, and just generally bringing the feature into a more mature state.

Improved Linux Installer

One of the main grumble points that users (and ourselves) have had with past Workstation for Linux releases is that the installation process wasn’t very smooth, and the vmware-config.pl script had to be re-run after any kernel upgrade.

We’ve fixed these issues by providing a new GTK-based installer that walks the user through the installation process, and by handling kernel configuration (if needed) during Workstation startup. The days of running a shell script to get Workstation running are over. Finally.

Virtual Machine Streaming

Ever want to preview a downloadable virtual machine without having to grab the entire zip file or tarball? VMs can be quite big and it’s a pain to download one only to find out that it doesn’t meet your needs.

The new VM Streaming feature gives users the ability to point Player or Workstation to a remote VM (if provided in the proper format). It will then download the bits as needed, and allow users to pause or restart the stream. It’s important to note that this will be slow at first until it has enough data to smoothly run files off the disk. When finished with the VM, the user can choose to keep what they have, or delete the cached VM from disk.

3D Acceleration with DirectX 9

Our hard-working team of 3D Code Monkeys have been working to bring support for DirectX 9 in the guest, supporting up to Shader Model 2.0. This means many more games are now playable, including one of my favorites, Portal.

Easier VM Creation

We’ve revamped the New VM wizard to provide a more streamlined VM creation process, complete with our new Easy Install feature. Simply put your installation CD in the drive or point the wizard to your ISO file and it will automatically determine the guest OS and default settings.

And lots more…

That’s just scratching the surface. We’ve made plenty of other improvements, listed in our release notes.

Some of us developers will be providing some support in the forums, and if you have a Linux Unity question, feel free to contact me directly.

Love,

Christian

Djblets and Review Board moving to jQuery

When we first began development of Review Board and its Django utility package Djblets almost two years ago, we needed to pick a JavaScript library to use. There were several good ones available at the time, and after evaluating several options we chose the Yahoo! UI Library (YUI) and YUI-Ext, an extension library to YUI. Both were excellent and have served us well over the past two years.

However, YUI-Ext itself is really no more, which means we needed to choose something new. We could have continued to bundle it and YUI with Review Board, but users of Djblets would have to hunt down a copy and load in all of YUI and YUI-Ext just to use such features as datagrids. This was, to say the least, inconvenient.

YUI-Ext and the Licensing Situation

Now I said YUI-Ext is no more, but really it’s still around, just in a new form. It had been renamed to ExtJS and became its own independent library. While compatible with YUI, most of the functionality we needed was really provided by ExtJS, meaning we didn’t really need both. Over time, YUI evolved as well, so we began looking into the differences and figuring out which to go with.

ExtJS, it turns out, was a non-starter for us. Unlike YUI-Ext before it, the ExtJS licensing terms were a bit restrictive and, frankly, confusing. Open source projects could use it under the GPL3, but commercial products required a special license per developer, which is $289 per developer. The GPL3 itself is unclear with regards to our situation. We’re an open source project, but we’re MIT-licensed. What if a company wants to modify something for their own use and not release it to the public? What if down the road someone wants to offer commercial extensions to Review Board? We’d have to choose the commercial license to be safe, but then contributors would also need to pay $289 for a license, wouldn’t they?

Looking Again at YUI

We didn’t want to step down a dangerous road with ExtJS, so we started to look again at YUI. It’s definitely come a long way and I must recommend it for developers looking for a strong toolkit with good UI support. They provide good documentation, many examples, and base functionality for nearly everything.

However, there’s a lot we’d have to rewrite to move to it, and if we had to rewrite the code anyway, I wanted to look around a bit at the current generation of JavaScript toolkits. Especially since our needs have changed over the years and we’re looking for something with a lighter footprint. We’re also moving away from the dialog-centered UI we have on some pages, which is where YUI shines.

jQuery

We ended up deciding to go with jQuery, partially because of the footprint and partially the clean way in which scripts can be written. As an experiment, I converted our Djblets datagrid code to jQuery. The result is a smaller, much more readable, reusable, cross-browser script. I was impressed by what jQuery let me do, and by the size.

I did some comparisons on the number of files downloaded and the size of the files, using the Review Board dashboard as a test.

With YUI and YUI-Ext, we were loading 7 JavaScript files, excluding our own scripts, at a total size of 376KB (when minified).

With jQuery, we loaded only 2 JavaScript files, at a total size of 128KB.

Our datagrid.js file also went down from 13KB to 9KB largely due to some of the niceties of jQuery’s API.

This is a pretty significant savings, a whole 252KB, which could be a couple of seconds on an average DSL line. And it’s not just the file size but the number of requests, which can make a big difference on a heavily accessed web server.

What This Means for Djblets

Developers using Djblets can now use datagrids without needing to do anything special. Djblets bundles jQuery, which it will use by default unless you choose to override which jQuery script is being used. This means all you need is an install of Djblets set up and you’re ready to use it!

Going Forward

We’re working on migrating the rest of Review Board to jQuery. This will take place over the next few weeks, and is one of the last major things we hope to do for our 1.0 release.

Review Board Roadmap and Donations

Roadmap

With the upcoming release of Django 1.0 in the next few weeks, we decided it was time to formalize a roadmap for Review Board 1.0. The roadmap provides a good overview of what users can expect for our release, and what it will take to get there.

At this point we’re asking for people to contribute wherever possible. The big thing is fixing bugs targeted for the 1.0 release. We’d also like some help in finalizing unit tests.

Quality Control

We’re doing what we can to improve quality control in Review Board. For a lot of people, Review Board works great, though setups often differ and some users hit issues that others never see. For this, we’re trying to improve our unit tests to catch these various cases. When people submit patches, we’d greatly appreciate unit tests to cover the new code, and in some cases will require them for the code submission.

Selenium

We will soon start using Selenium in our unit test process to simulate user action in various web browsers. Selenium allows for remote-controlling a web browser, simulating clicks, text input, and other user actions and checking the results. Over time, when our Selenium test suite is more complete, we should be able to catch browser-specific problems a lot more easily.

Buildbot Server

Another issue users have hit lately is breakages due to changes in Django for the 1.0 release. As things calm down there, this will become less of an issue, but we’ve put things in place to catch these problems before users do.

We have just set up a buildbot server that will perform a full build and run the test suite whenever there’s a code check-in to Review Board, Django, Djblets or Django-Evolution. It will then notify us when there’s a new breakage. Users can check the build page before updating just to make sure they won’t hit a major problem. Later on, our buildbot server will generate nightly builds and handle Selenium tests.

We have a limited number of servers to test with. If you have server space and resources to donate and would like to run a BuildBot Slave server, let me know. We’re looking to set up slaves to test various combinations of the following:

  • Python 2.5
  • Python 2.4
  • Django SVN trunk
  • Django 1.0
  • Windows 2000, XP and Vista
  • Internet Explorer 6 and 7 (for Selenium tests)
  • Opera (for Selenium tests)
  • Firefox 2 and 3 (for Selenium tests)

Sandbox

Our BuildBot server is also set up to allow us to test code changes before we submit the code. Running a sandbox build of our pending code will cause all build slaves to run the entire test suite. This ensures that we don’t break things accidentally.

If you’re a contributor working on large patches for Review Board and would like to have access to the sandbox, please post to the mailing list and we can work with you on getting an account set up.

Installation Improvements

We’re working to make the installation experience much easier. I’m in the process of creating Python easy_install packages for Review Board and Djblets. Soon, users will be able to simply easy_install ReviewBoard to get going instead of checking out the development tree. I’m hoping to create both nightly builds and release builds.

Code will soon go in to move the entire project configuration into the administration interface. Modifying settings_local.py and restarting the server will be a thing of the past. All that will be left there will be a few site-specific settings and the database settings. Expect this to go in real soon.

A tool is in development for helping to generate the initial Review Board server tree based on an installed reviewboard Python module (using easy_install) and generating the web server configuration files. This will hopefully take care of a lot of problems people hit when trying to get their server configuration right the first time.

And last but not least, before 1.0 we will have a first-time installation page that handles the creation of the initial settings_local.py and the adding and checking of repositories.

So in the end, the installation process will be something along the lines of:

  1. sudo easy_install ReviewBoard
  2. sudo rb-install-site /var/www/reviews.mycompany.com
  3. Fill out the fields presented.
  4. Hand-tweak the configuration files if needed.
  5. Go to the page for the new Review Board server, fill out the fields and finish the install.

This is the goal, anyway. We’re going to try to get as close to this as possible for 1.0.

Donations

Review Board has become a full-time project for us. Though it got its start at VMware, it’s really a personal project developed in our spare time, not a project run by VMware. As the project grows, we’ve been putting more time, energy and money into it.

Hosting fees have started to become large, given that we’re now hosting the main project website, the main Review Board server for our code reviews, the demo server, the Google Summer of Code review server and the BuildBot server and slaves. Down the road, we have many plans that will also require funding.

To help cover our costs, we’re now made it easy to donate to the project. If Review Board has helped you, your company, team, or project and saved you money or time over alternative solutions, maybe you’d like to help give back to keep our project going. Every bit helps.

Django Development with Djblets: Dynamic Site Configuration

Django’s a powerful toolkit and offers many things to ease the creation of websites and web applications. Features such as the automatically built Administration UI are just awesome and save developers from having to reinvent the wheel on every project. It does fall short in a few areas, however, and one of them is site configuration.

Now, Django’s settings support isn’t bad. You get a nice little settings.py file to put settings in for your site/webapp, and since it’s just a Python module, your settings can really hold whatever data you want and can be well documented with comments. That’s all great, but when you want to actually change a setting, you must SSH in, edit the file, save it, and restart the server.

This is fine for small websites with a few visitors, or sites with almost no custom settings, but for large sites it can be a problem. Bringing down the site however briefly could interrupt users, generate errors, causing worries during a checkout process or when editing a post on a site. Doing anything more complex and preventing downtime really means rolling your own thing.

So we rolled our own thing. Review Board has operated with the standard Django settings module since day 1, but it’s become obvious over time that it wasn’t good enough for us. So we wrote the dynamic Site Configuration app for Djblets.

djblets.siteconfig

siteconfig is a relatively small Django app that stores setting data in the database, along with project versioning data in case you need it to handle migrations of some sort down the road. There’s a lot of useful things in this app, so I’ll summarize what it provides before I jump into details:

  • Saving/Retrieving settings.

    Setting values can be simple strings, integers, booleans, or something more complex like an array of dictionaries of key/value pairs.

  • Default values for settings.

    These default values could be provided by your application directory or could be based off the contents in your settings.py file.

  • Syncing to/from settings.py.

    Just because you’re using djblets.siteconfig doesn’t mean you can’t still support settings.py. Settings can be pulled from your old settings and saved back there when modified.

  • Compatibility with standard Django settings.

    Django offers a lot of useful settings that you may want to customize. We do the hard work of mapping these and keeping them in sync so you can customize them dynamically.

  • Auto-generated settings pages.

    Much like the existing admin UI, we offer an easy way to provide settings pages for your application. Go ahead and stick these in the admin UI if you like.

Getting Started

To start out, you’ll want to add some code in your app that creates a SiteConfiguration model, perhaps as a post_syncdb management hook. This is project-specific, since you’ll be storing version information in here and linking it with your existing Site. Here’s one way to do it. We’ll use this file as a template in later examples:

# myapp/siteconfig.py
# NOTE: Import this file in your urls.py or some place before
#       any code relying on settings is imported.
from django.contrib.sites.models import Site

from djblets.siteconfig.models import SiteConfiguration


def load_site_config():
    """Sets up the SiteConfiguration, provides defaults and syncs settings."""
    try:
        siteconfig = SiteConfiguration.objects.get_current()
    except SiteConfiguration.DoesNotExist:
        # Either warn or just create the thing. Depends on your app
        siteconfig = SiteConfiguration(site=Site.objects.get_current(),
                                       version="1.0")

    # Code will go here for settings work in later examples.


load_site_config()

Saving/Retrieving Settings

Settings exist in a SiteConfiguration model inside a JSONField. Anything that Django’s native JSON serializer/deserializer code can handle, you can store. Usually you’ll want to store primitive values (strings, booleans, integers, etc.), but you’re free to do something more complex.

from djblets.siteconfig.models import SiteConfiguration


siteconfig = SiteConfiguration.objects.get_current()
siteconfig.set("mystring", "foobar")
siteconfig.set("mybool", True)
siteconfig.set("myarray", [1, 2, 3, 4])

mybool = siteconfig.get("mybool")

It’s pretty straightforward. The set/get functions are just simple accessors for the SiteConfiguration.settings JSON field, but you’ll want to use them because they’ll handle the registered defaults for settings, which I will get to in a moment.

Since this is just a Djblets JSONField, which is a glorified dictionary, you can do a lot of things, such as iterate through the keys and values:

for key, value in siteconfig.settings:
    print "%s: %s" % (key, value)

And so on. Let’s go a step further.

Default Values

Say you’re starting fresh and just created your SiteConfiguration instance, or you’ve introduced a new setting into an existing site. The setting won’t be in the saved settings, so what value is returned when you do a get call? Well, that depends on your setup a bit.

In the first case, with a fresh new setting:

>>> print siteconfig.get("mynewsetting")
None

Any setting without a default value and not in the saved settings will return None. Good ol’ reliable None.. If you want to make sure you return something sane at this specific callpoint, you can specify a default value in the call to get, like so:

>>> print siteconfig.get("mynewsetting", default=123)
123

This can be really useful at times, but it’s a pain to have to do this in every call and keep the values in sync. So we provide a third option: Registered default values.

# myapp/siteconfig.py


defaults = {
    'mystring':     'Foobar',
    'mybool':       False,
    'mynewsetting': 123,
}


def load_site_config():
    ...

    if not siteconfig.get_defaults():
        siteconfig.add_defaults(defaults)

That’s all it takes. Now calling get with just the setting name will return the default value, if the setting hasn’t been saved in the database.

Down the road we’re going to have support for automatic querying of apps to grab their settings, giving third party apps an easier way to integrate into codebases using siteconfig.

Syncing Settings with settings.py

Django’s settings.py is and will continue to be an important place for some settings to go. If you’re developing a reusable application for other projects, you may not want to fully ditch settings.py. Or maybe you’re using a third party application that uses settings.py and want to make the settings dynamic.

siteconfig was designed from the beginning to handle syncing settings in both places. Now, when I say syncing, I don’t mean we write out to settings.py, since that would require enforcing certain permissions on the file. What we do instead is to load in the values from settings.py if not set in the siteconfig settings, and to write out to the settings object, an in-memory version of settings.py.

Let’s revisit our example above, but in this case we want to be able to dynamically control Django’s EMAIL_HOST setting.

# myapp/siteconfig.py
from django.conf import settings

from djblets.siteconfig.django_settings import apply_django_settings,
                                               generate_defaults


settings_map = {
    # siteconfig key    settings.py key
    'mail_host':        'EMAIL_HOST',
}

defaults = {
    ...
}
defaults.update(generate_defaults(settings_map))


def load_site_config():
    ...

    apply_django_settings(siteconfig, settings_map)

What we did here was to generate a mapping table of our custom settings to Django settings.py settings. We can then generate a set of defaults using the generate_defaults function. This goes through the Django settings keys, pulls out the values if set in settings.py, and returns a dictionary similar to the one we wrote above. This guarantees that our default values will be what you have configured in settings.py, handling the first part of our synchronization.

The second part is handled through use of the apply_django_settings function. This will take a siteconfig and a settings map and write out all values that have actually changed. So if “mail_host” above is never modified, apply_django_settings won’t write it out to the database, allowing the default value to change without having to do anything too fancy.

Compatibility with Django’s Settings

The above example dealt with the settings.EMAIL_HOST setting, but in reality we won’t have to cover this at all. There’s a few other goodies in the django_settings module that handle all the Django settings for you.

First off is get_django_settings_map. You’ll rarely need to call this directly, but it returns a settings map for all the Django settings sites are likely to want to change.

Then there’s get_django_defaults, which you’ll want to either merge into your existing defaults table or add directly. We don’t do it for you because you may very well not care about these settings.

The third is one you just saw, apply_django_settings. In the above example, we passed in our settings map, but if you don’t specify one it will use get_django_settings_map.

Let’s take a look at how this works.

# myapp/siteconfig.py

from djblets.siteconfig.django_settings import apply_django_settings,
                                               get_django_defaults


def load_site_config():
    ...

    if not siteconfig.get_defaults():
        siteconfig.add_defaults(defaults)
        siteconfig.add_defaults(get_django_defaults())

    apply_django_settings(siteconfig, settings_map)
    apply_django_settings(siteconfig)

This is all it takes.

If you take a look at django_settings.py, you’ll notice that we don’t reuse the existing Django settings names and instead provide our own. This is an attempt to cleanly namespace the settings used. You’ll also notice that there’s several settings maps and defaults functions. This is so you can be more picky if you really want to.

Auto-generated Settings Pages

Oh, this is where it gets fun.

Dynamic settings are all well and good, but if you can’t set them through your browser, why bother?

We wanted to make sure that not only could these be modified through a browser, but that it was dead simple to put up pages for changing settings. All you have to do is add a URL mapping and one form per page.

The form doesn’t even need much more than fields.

Let’s start out with some code. It should be pretty self-explanatory.

# urls.py
from myapp.forms import GeneralSettingsForm

urlpatterns = patterns('',
    (r'^admin/settings/general/$', 'djblets.siteconfig.views.site_settings',
     {'form_class': GeneralSettingsForm}),
    (r'^admin/(.*)', admin.site.root),
)
# myapp/forms.py
from django import forms
from djblets.siteconfig.forms import SiteSettingsForm


class GeneralSettingsForm(SiteSettingsForm):
    mystring = forms.CharField(
        label="My String",
        required=True)

    mybool = forms.BooleanField(
        label="My Boolean",
        required=False)

    mail_host = forms.CharField(
        label="Mail Server",
        required=False)


    class Meta:
        title = "General Settings"

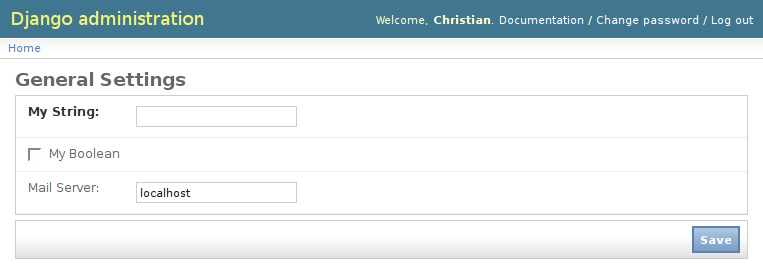
That’s it. Now just go to /admin/settings/general/ and you’ll see your brand new settings form. It will auto-load existing or default settings and save modified settings. Like any standard form, it will handle help text, field validation and error generation.

Example Settings Page

Proxy Fields

For a lot of sites, this will be sufficient. For more complicated settings, we have a few more things we can do.

Let’s take the array above. Django’s forms doesn’t have any concept of array values, but we can fake it with custom load and save methods and a proxy field.

# myapp/forms.py
import re

class GeneralSettingsForm(SiteSettingsForm):
    ...

    my_array = forms.CharField(
        label="My Array",
        required=False,
        help_text="A comma-separated list of anything!")

    def load(self):
        self.fields['my_array'].initial =
            ', '.join(self.siteconfig.get('myarray'))

        super(GeneralSettingsForm, self).load()

    def save(self):
        self.siteconfig.set('myarray',
            re.split(r',s*', self.cleaned_data['my_array']))

        super(GeneralSettingsForm, self).save()

    class Meta:
        save_blacklist = ('my_array',)

What we’re essentially doing here is to come up with a new field not in the settings database (notice “my_array” versus “myarray”) and to use this as a proxy for the real setting. We then handle the serialization/deserialization in the save and load methods.

When doing this, it’s very important to add the proxy field to the save_blacklist tuple in the Meta class so that the form doesn’t save your proxy field in the database!

Fieldsets

Much like Django’s own administration UI, the SiteSettingsForm allows for placing fields into custom fieldsets, allowing settings to be grouped together under a title and optional description. This is done by filling out the fieldsets variable in the Meta class, like so:

class GeneralSettingsForm(SiteSettingsForm):
    class Meta:
        fieldsets = (
            {
                'title':   "General",
                'classes': ('wide',),
                'fields':  ('mystring', 'mybool', 'my_array',),
            },
            {
                'title':       "E-Mail",
                'description': "Some description of e-mail settings.",
                'classes':     ('wide',),
                'fields':      ('mail_host',),
            },
        )

This will result in two groups of settings, each with a title, and one with a description. The description can span multiple paragraphs by inserting newlines (“n“). All fields in the dictionary except for 'fields' are optional.

Re-applying Django settings

When you modify a field that corresponds to a setting in settings.py, you want to make sure you re-apply the setting or you could break something. This is pretty simple. Again override save as follows:

from myapp.siteconfig import load_site_config


class GeneralSettingsForm(SiteSettingsForm):
    def save(self):
        super(GeneralSettingsForm, self).save()
        load_site_config()

This will re-synchronize the settings, making sure everything is correct. Note that down the road, this will likely be automatic.

There’s one last thing to show you…

Disabled Fields

Sometimes it’s handy to disable fields. Maybe a particular setting requires a third party module that isn’t installed. The SiteSettingsForm has two special dictionaries, disabled_fields and disabled_reasons, that handle this. Just override your load function again.

class GeneralSettingsForm(SiteSettingsForm):
    def load(self):
        if not myarray_supported():
            self.disabled_fields['my_array'] = True
            self.disabled_reasons['my_array'] =
                "This cannot be modified because we don't support arrays today."

        super(GeneralSettingsForm, self).load()

The resulting fields in the HTML will be disabled, and the error message will be displayed below the field.

Depending on whether or not you have a custom administration UI, you may want to tweak the CSS file or completely override it. Note that this all assumes that the djblets/media/ directory exists in your MEDIA_URL as the “djblets” directory. If you have something custom, you can always override siteconfig/settings.html and pass the new template to the view along with your settings form.

More Coming Soon!

There’s some new stuff in the works for the siteconfig app. Auto-detection of defaults and settings maps is the big one. I also have a few more useful tricks for doing advanced things with settings pages that I’ll demonstrate.

If you’re a user of Djblets, let us know, and feel free to blog about it! I’ll link periodically to other blogs talking about Djblets and projects using Djblets.

And as always, suggestions, constructive criticism and patches are always welcome 🙂

Django Development with Djblets: Data Grids

It’s been a while since my last post in this series, but this one’s a good one.

A common task in many web applications is to display a grid of data, such as rows from a database. Think the Inbox from GMail, the model lists from the Django administration interface, or the Dashboard from Review Board. It’s not too hard to write something that displays a grid by doing something like:


{% for user in users %}
 
{% endfor %}
Username First Name Last Name
{{user.username}} {{user.first_name}} {{user.last_name}}

This works fine, so long as you don’t want anything fancy, like sortable columns, reorderable columns, or the ability to let users specify which columns they want to see. This requires something a bit more complex.

djblets.datagrids

We wrote a nifty little set of classes for making data grids easy. Let’s take the above example and convert it over.

# myapp/datagrids.py
from django.contrib.auth.models import User
from djblets.datagrid.grids import Column, DataGrid

class UserDataGrid(DataGrid):
    username = Column("Username", sortable=True)
    first_name = Column("First Name", sortable=True)
    last_name = Column("Last Name", sortable=True)

    def __init__(self, request):
        DataGrid.__init__(self, request, User.objects.filter(is_active=True), "Users")
        self.default_sort = ['username']
        self.default_columns = ['username', 'first_name', 'last_name']
# myapp/views.py
from myapp.datagrids import UserDataGrid

def user_list(request, template_name='myapp/datagrid.html'):
    return UserDataGrid(request).render_to_response(template_name)

Now while this may look a bit more verbose, it offers many benefits in return. First off, users will be able to reorder the columns how they like and choose which columns to see. You could extend the above DataGrid to add some new column but leave it out of default_columns so that only users who really care about it would see it.

Custom columns

Let’s take this a step further. Say we want our users datagrid to optionally show staff members with a special badge. This might be useful to some users, but not all, so we’ll leave it out by default. We can implement this by creating a custom column with image data:

class StaffBadgeColumn(Column):
    def __init__(self, *args, **kwargs):
        Column.__init__(self, *args, **kwargs)

        # These define what will appear in the column list menu.
        self.image_url = settings.MEDIA_URL + "images/staff_badge.png"
        self.image_width = 16
        self.image_height = 16
        self.image_alt = "Staff"

        # Give the entry in the columns list menu a name.
        self.detailed_label = "Staff"

        # Take up as little space as possible.
        self.shrink = True

    def render_data(self, user):
        if user.is_staff:
            return '%s' %
                (self.image_url, self.image_width, self.image_height, self.image_alt)

        return ""

class UserDataGrid(DataGrid):
    ...
    staff_badge = StaffBadgeColumn()
    ...

This will add a new entry to the datagrid’s column customization menu showing the staff badge with a label saying “Staff.” If users enable this column, their datagrid will update to show an staff icon for any users who are marked as staff.

Custom columns can render data in a couple of different ways.

The first is to bind the column to a field in the model. By default, a Column instance added to a DataGrid will use its own name (such as “first_name” above) as a lookup in the object. If you want to use a custom field, set the db_field attribute on the column. This field can span relationships as well. For example:

class UserDataGrid(DataGrid):
    ...
    # Uses the field name as the lookup.
    username = Column("Username")

    # Spans relationships, looking up the age in the profile.
    age = Column("profile__age")

The second is the way shown above, by overriding the render_data function. This takes an object, which is the object the datagrid represents, and outputs HTML. The logic in this can be quite complicated, depending on what’s needed.

Linking to objects

A datagrid is pretty worthless if you can’t link entries for the object to a URL. We have a couple of ways to do this.

To link a column on a datagrid to a URL, set the link parameter on the DataGrid to True. By default, the URL used will be the result of calling get_absolute_url() on the object represented by the datagrid, but you can override this:

# myapp/datagrids.py

class UserDataGrid(DataGrid):
    username = Column("Username", sortable=True, link=True)
    ...
    @staticmethod
    def link_to_object(user, value):
        return "/users/%s/" % user

Then

link_to_object takes an object and a value. The object is the object being represented by the datagrid, and the value is the rendered data in the cell. The result is a valid path or URL. In the above example, we’re explicitly defining a path, but we could use Django’s reverse function.

Usually the value is ignored, but it can be useful. Imagine that your Column represents a field that is a ForeignKey of an object. The contents of the cell is the string version of that object (implemented by the __str__ or __unicode__ function), but it’s just an object and you want to link to it. This is where value comes in handy, as instead of being HTML output, it’s actually an object you can link to.

If you intend to link a particular column to value.get_absolute_url(), we provide a handy utility function called link_to_value which exists as a static method on the DataGrid. You can pass it (or any function) to the Column’s constructor using the link_func parameter.

class UserDataGrid(DataGrid):
    ...
    myobj = Column(link=True, link_func=link_to_value)

Custom columns can hard-code their own link function by explicitly setting these values in the constructor.

Saving column settings

If a user customizes his column settings by adding/removing columns or rearranging them, he probably expects to see his customizations the next time he visits the page. DataGrids can automatically save these settings in the user’s profile, if the application supports it. Handling this is as simple as adding some fields to the app’s Profile model and setting a couple options in the DataGrid. For example:

# myapp/models.py

class Profile(models.Model):
    user = models.ForeignKey(User, unique=True)

    # Sort settings. One per datagrid type.
    sort_user_columns = models.CharField(max_length=256, blank=True)

    # Column settings. One per datagrid type.
    user_columns = models.CharField(max_length=256, blank=True)
# myapp/datagrids.py

class UserDataGrid(DataGrid):
    ...
    def __init__(self, request):
        self.profile_sort_field = "sort_user_columns"
        self.profile_columns_field = "user_columns"

The DataGrid code will handle all the loading and saving of customizations in the Profile. Easy, isn’t it?

Requirements and compatibility

Right now, datagrids require both the Yahoo! UI Library and either yui-ext (which is hard to find now) or its replacement, ExtJS.

Review Board, which Djblets was mainly developed for, still relies on yui-ext instead of ExtJS, so datagrids today by default are built with that in mind. However, the JavaScript portion of datagrids should work with ExtJS today. The default template for rendering the datagrids (located in djblets/datagrids/templates/datagrids/) assumes both YUI and yui-ext are present in the media path, but sites using datagrids are encouraged to provide their own template to reflect the actual locations and libraries used.

We would like to work with more JavaScript libraries, so if anyone wants to provide an implementation for their favorite library or help to dumb down our implementation to work with any and all, we’d welcome patches.

See it in action

We make extensive use of datagrids on Review Board. You can get a sense of it and play around by looking at the users list and the dashboard (which requires an account).

That’s it for now!

There’s more to datagrids than what I’ve covered here, but this should give you a good understanding of how they work. Later on I’d like to do a more in-depth article on how datagrids work and some more advanced use cases for them.

For now, take a look at the source code and Review Board’s datagrids for some real-world examples.

Django Tips: PIL, ImageField and Unit Tests

I recently spent a few days trying to track down a bug in Review Board with our unit tests. Basically, unit tests involving uploading a file to a models.ImageField would fail with a validation error specifying that the file wasn’t an image. This worked fine when actually using the application, just not during unit tests.

The following code would cause this problem. (Note that this isn’t actual code, just a demonstration.)

# myapp/models.py
from django.db import models

class MyModel(models.Model):
    image = models.ImageField()
# myapp/forms.py
from django import forms
from myapp.models import MyModel

class UploadImageForm(forms.Form):
    image_path = forms.ImageField(required=True)

    def create(self, file):
        mymodel = MyModel()
        mymodel.save_image_file(file.name, file, save=True)
        return mymodel
# myapp/views.py
from myapp.forms import UploadImageForm

def upload(request):
    form = UploadImageForm(request.POST, request.FILES)

    if not form.is_valid():
        # Return some error
        pass

    # Return success
# myapp/tests.py
from django.test import TestCase

class MyTests(TestCase):
    def testImageUpload(self):
        f = open("testdata/image.png", "r")
        resp = self.client.post("/upload/", {
            'image_path': f,
        })
        f.close()

After a good many hours going through the Django code, expecting there to be a problem with file handles becoming invalidated or the read position not being reset to the beginning of the file, I finally decided to look at PIL, the Python Imaging Library. It turns out that at this point, due to some weirdness with unit tests, PIL hadn’t populated its known list of file formats. All it knew was BMP, and so my perfectly fine PNG file didn’t work.

The solution? Be sure to import PIL and call init() before the unit tests begin. If you have a custom runner (as we do), then putting it in here is appropriate. Just add the following:

from PIL import Image
Image.init()

Hopefully this helps someone else with the problems I’ve dealt with the past few days.

Scroll to Top