Beanbag

Integration and Simulation Tests in Python

One of my (many) tasks lately has been to rework unit and integration tests for Review Bot, our automated code review add-on for Review Board.

The challenge was providing a test suite that could test against real-world tools, but not require them. An ever-increasing list of compatible tools has threatened to become an ever-increasing burden on contributors. We wanted to solve that.

So here’s how we’re doing it.

First off, unit test tooling

First off, this is all Python code, which you can find on the Review Bot repository on GitHub.

We make heavy use of kgb, a package we’ve written to add function spies to Python unit tests. This goes far beyond Mock, allowing nearly any function to be spied on without having to be replaced. This module is a key component to our solution, given our codebase and our needs, but it’s an implementation detail — it isn’t a requirement for the overall approach.

Still, if you’re writing complex Python test suites, check out kgb.

Deciding on the test strategy

Review Bot can talk to many command line tools, which are used to perform checks and audits on code. Some are harder than others to install, or at least annoying to install.

We decided there’s two types of tests we need:

  1. Integration tests — ran against real command line tools
  2. Simulation tests — ran against simulated output/results that would normally come from a command line tool

Being that our goal is to ease contribution, we have to keep in mind that we can’t err too far on that side at the expense of a reliable test suite.

We decided to make these the same tests.

The strategy, therefore, would be this:

  1. Each test would contain common logic for integration and simulation tests. A test would set up state, perform the tool run, and then check results.
  2. Integration tests would build upon this by checking dependencies and applying configuration before the test run.
  3. Simulation tests would be passed fake output or setup data needed to simulate that tool.

This would be done without any code duplication between integration or simulation tests. There would be only one test function per expectation (e.g., a successful result or the handling of an error). We don’t want to worry about tests getting out of sync.

Regression in our code? Both types of tests should catch it.

Regression or change in behavior in an integrated tool? Any fixes we apply would update or build upon the simulation.

Regression in the simulation? Something went wrong, and we caught it early without having to run the integration test.

Making this all happen

We introduced three core testing components:

  1. @integration_test() — a decorator that defines and provides dependencies and input for an integration test
  2. @simulation_test() — a decorator that defines and provides output and results for a simulation test
  3. ToolTestCaseMetaClass — a metaclass that ties it all together

Any test class that needs to run integration and simulation tests will use ToolTestCaseMetaClass and then apply either or both @integration_test/@simulation_test decorators to the necessary test functions.

When a decorator is applied, the test function is opted into that type of test. Data can be passed into the decorator, which is then passed into the parent test class’s setup_integration_test() or setup_simulation_test().

These can do whatever they need to set up that particular type of test. For example:

  • Integration test setup defaults to checking dependencies, skipping a test if not met.
  • Simulation test setup may write some files or spy on a subprocess.Popen() call to fake output.


For example:

class MyTests(kgb.SpyAgency, TestCase,
              metaclass=ToolTestCaseMetaClass):
    def setup_simulation_test(self, output):
        self.spy_on(execute, op=kgb.SpyOpReturn(output))

    def setup_integration_test(self, exe_deps):
        if not are_deps_found(exe_deps):
            raise SkipTest('Missing one or more dependencies')

    @integration_test(exe_deps=['mytool'])
    @simulation_test(output=(
        b'MyTool 1.2.3\n'
        b'Scanning code...\n'
        b'0 errors, 0 warnings, 1 file(s) checked\n'
    ))
    def test_execute(self):
        """Testing MyTool.execute"""
        ...

When applied, ToolTestCaseMetaClass will loop through each of the test_*() functions with these decorators applied and split them up:

  • Test functions with @integration_test will be split out into a test_integration_<name>() function, with a [integration test] suffix appended to the docstring.
  • Test functions with @simulation_test will be split out into test_simulation_<name>(), with a [simulation test] suffix appended.

The above code ends up being equivalent to:

class MyTests(kgb.SpyAgency, TestCase):
    def setup_simulation_test(self, output):
        self.spy_on(execute, op=kgb.SpyOpReturn(output))

    def setup_integration_test(self, exe_deps):
        if not are_deps_found(exe_deps):
            raise SkipTest('Missing one or more dependencies')

    def test_integration_execute(self):
        """Testing MyTool.execute [integration test]"""
        self.setup_integration_test(exe_deps=['mytool'])
        self._test_common_execute()

    def test_simulation_execute(self):
        """Testing MyTool.execute [simulation test]"""
        self.setup_simulation_test(output=(
            b'MyTool 1.2.3\n'
            b'Scanning code...\n'
            b'0 errors, 0 warnings, 1 file(s) checked\n'
        ))
        self._test_common_execute()

    def _test_common_execute(self):
        ...

Pretty similar, but less to maintain in the end, especially as tests pile up.

And when we run it, we get something like:

Testing MyTool.execute [integration test] ... ok
Testing MyTool.execute [simulation test] ... ok

...

Or, you know, with a horrible, messy error.

Iterating on tests

It’s become really easy to maintain and run these tests.

We can now start by writing the integration test, modify the code to log any data that might be produced by the command line tool, and then fake-fail the test to see that output.

class MyTests(kgb.SpyAgency, TestCase,
              metaclass=ToolTestCaseMetaClass):
    ...

    @integration_test(exe_deps=['mytool'])
    def test_process_results(self):
        """Testing MyTool.process_results"""
        self.setup_files({
            'filename': 'test.c',
            'content': b'int main() {return "test";}\n',
        })

        tool = MyTool()
        payload = tool.run(files=['test.c'])

        # XXX
        print(repr(payload))

        results = MyTool().process_results(payload)

        self.assertEqual(results, {
            ...
        })

        # XXX Fake-fail the test
        assert False

I can run that and get the results I’ve printed:

======================================================================
ERROR: Testing MyTool.process_results [integration test]
----------------------------------------------------------------------
Traceback (most recent call last):
    ...
-------------------- >> begin captured stdout << ---------------------
{"errors": [{"code": 123, "column": 13, "filename": "test.c", "line': 1, "message": "Expected return type: int"}]}

Now that I have that, and I know it’s all working right, I can feed that output into the simulation test and clean things up:

class MyTests(kgb.SpyAgency, TestCase,
              metaclass=ToolTestCaseMetaClass):
    ...

    @integration_test(exe_deps=['mytool'])
    @simulation_test(output=json.dumps(
        'errors': [
            {
                'filename': 'test.c',
                'code': 123,
                'line': 1,
                'column': 13,
                'message': 'Expected return type: int',
            },
        ]
    ).encode('utf-8'))
    def test_process_results(self):
        """Testing MyTool.process_results"""
        self.setup_files({
            'filename': 'test.c',
            'content': b'int main() {return "test";}\n',
        })

        tool = MyTool()
        payload = tool.run(files=['test.c'])
        results = MyTool().process_results(payload)

        self.assertEqual(results, {
            ...
        })

Once it’s running correctly in both tests, our job is done.

From then on, anyone working on this code can just simply run the test suite and make sure their change hasn’t broken any simulation tests. If it has, and it wasn’t intentional, they’ll have a great starting point in diagnosing their issue, without having to install anything.

Anything that passes simulation tests can be considered a valid contribution. We can then test against the real tools ourselves before landing a change.

Development is made simpler, and there’s no worry about regressions.

Going forward

We’re planning to apply this same approach to both Review Board and RBTools. Both currently require contributors to install a handful of command line tools or optional Python modules to make sure they haven’t broken anything, and that’s a bottleneck.

In the future, we’re looking at making use of python-nose‘s attrib plugin, tagging integration and simulation tests and making it trivially easy to run just the suites you want.

We’re also considering pulling out the metaclass and decorators into a small, reusable Python packaging, making it easy for others to make use of this pattern.

Using Freshdesk with PagerDuty for Better Customer Support

At Beanbag, we’ve been using Freshdesk to handle customer support for Review Board, Power Pack, and RBCommons.

We’ve also been using PagerDuty to inform us on any critical events, such as servers going down, memory/CPU load, or security updates we need to apply to our servers.

Our customers’ problems are just as important to us as our servers’ problems, but we were lacking a great way to really get our attention when our customers needed it most. After we started using PagerDuty, the solution became obvious: Integrate PagerDuty with Freshdesk! But how? Neither side had any native integration with the other.

Enter Freshdesk webhooks

Freshdesk’s webhooks support is pretty awesome. Not only can you set them up for any custom condition you like, but payload they send is completely customizable, allowing you to easily construct an API request to another service – like PagerDuty!

This is super useful. It means you won’t need any sort of proxy service or custom script to be set up on your server. All you need are your Freshdesk and PagerDuty accounts.

Deciding on your setup

There are probably many ways you can configure these two to talk, and we played with a couple configurations. Here are the general rules we settled on:

  • Only integrate PagerDuty for paying customers (with whom we have support contracts). We don’t want alerts from random people e-mailing us.
  • When a paying customer open new tickets or reply to existing tickets, assign them to a “Premium Support” group, and create an alert in PagerDuty.
  • When an agent replies or marks a ticket in “Premium Support” as resolved, resolve the alert in PagerDuty.

We always resolve the alert instead of acknowledging it, in order to prevent PagerDuty from auto-unacknowledging a period of time after the agent replies. When the customer replies, it will just reuse the same alert ID, instead of creating new alerts.

Also note that we’re setting things up to alert all of our support staff (all two of us founders) on any important tickets. You may wish to adjust these rules to do something a bit more fine-grained.

Okay, let’s get this set up.

Setting up PagerDuty

We’re going to create a custom Service in PagerDuty. First, log into PagerDuty and click “Escalation Policies” at the top. Then click the New Escalation Policy button.

Name this policy something like “Premium Support Tickets,” and assign your agents.

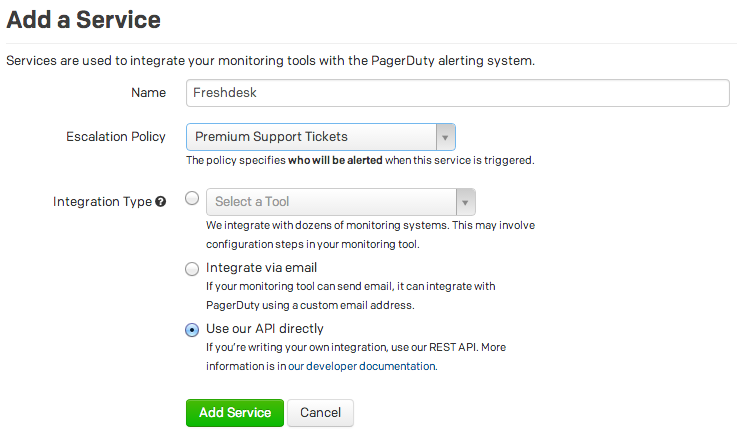
Next, click “Services” at the top. Then click the Add New Service button and set these fields:

title

Click Add Service. Make a note of the Service API Key. You’ll need this for later.

Edit your service and Uncheck the Incident Ack Timeout and Incident Auto-Resolution checkboxes. Click Save.

Optionally, configure some webhooks to point to other services you want to notify. For instance, we added Slack, so that we’ll instantly see any support requests in-chat.

Okay, you’re done here. Let’s move on to Freshdesk.

Setting up Freshdesk

Freshdesk is going to require four rules: One Dispatch’r and three Observers.

I’ll provide screenshots on this as a reference, along with some code and URLs you can copy/paste.

Start by logging in and going to the Administration page.

Dispatch’r Rule: Alert PagerDuty for important customer tickets

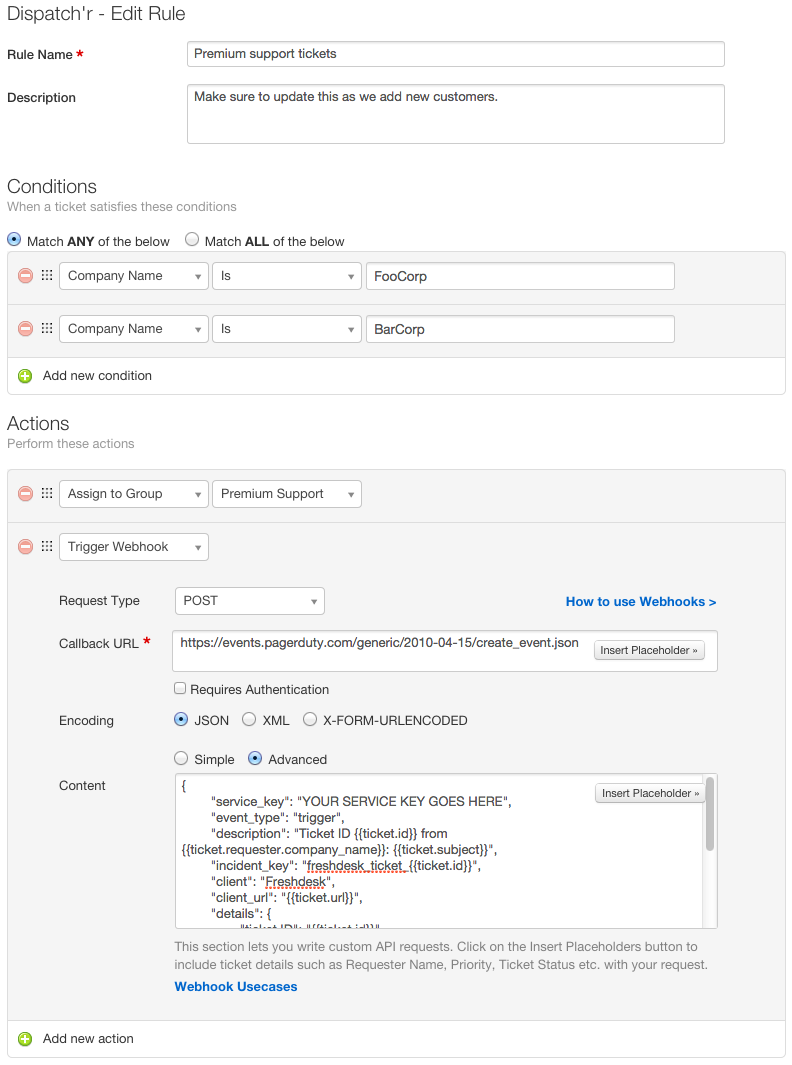
Click “Dispatch’r” and add a new rule.

Dispatchr rule

Set the Rule name and Description to whatever you like. We added a little reminder in the description saying that this must be updated as we add customers.

For the conditions, we’re matching based on company names we’ve created in Freshdesk for our customers. You may instead want to base this on Product, From E-mail, Contact Name, or whatever you like.

For the Callback URL, use https://events.pagerduty.com/generic/2010-04-15/create_event.json. Keep note of this, because you’ll use it for all the payloads you’ll set.

Now set the Content to be the following.

{
    "service_key": "YOUR SECRET KEY GOES HERE",
    "event_type": "trigger",
    "description": "Ticket ID {{ticket.id}} from {{ticket.requester.company_name}}: {{ticket.subject}}",
    "incident_key": "freshdesk_ticket_{{ticket.id}}",
    "client": "Freshdesk",
    "client_url": "{{ticket.url}}",
    "details": {
        "ticket ID": "{{ticket.id}}",
        "status": "{{ticket.status}}",
        "priority": "{{ticket.priority}}",
        "type": "{{ticket.ticket_type}}",
        "due by": "{{ticket.due_by_time}}",
        "requester": "{{ticket.requester.name}}",
        "requester e-mail": "{{ticket.from_email}}"
    }
}

Make note of the whole YOUR SERVICE KEY GOES HERE part in line 2. Remember the service key in PagerDuty? You’ll set that here. You’ll also need to do this for all the webhook payloads I show you from here on out.

Go ahead and add any other actions you may want (such as adding watchers, or setting the priority), and click Save.

Click Reorder and place that rule at the top.

Setting up Freshdesk Observer

Now we need to set up a few observers. Go back to the Administration page and click “Observer.” We’ll be adding three new rules.

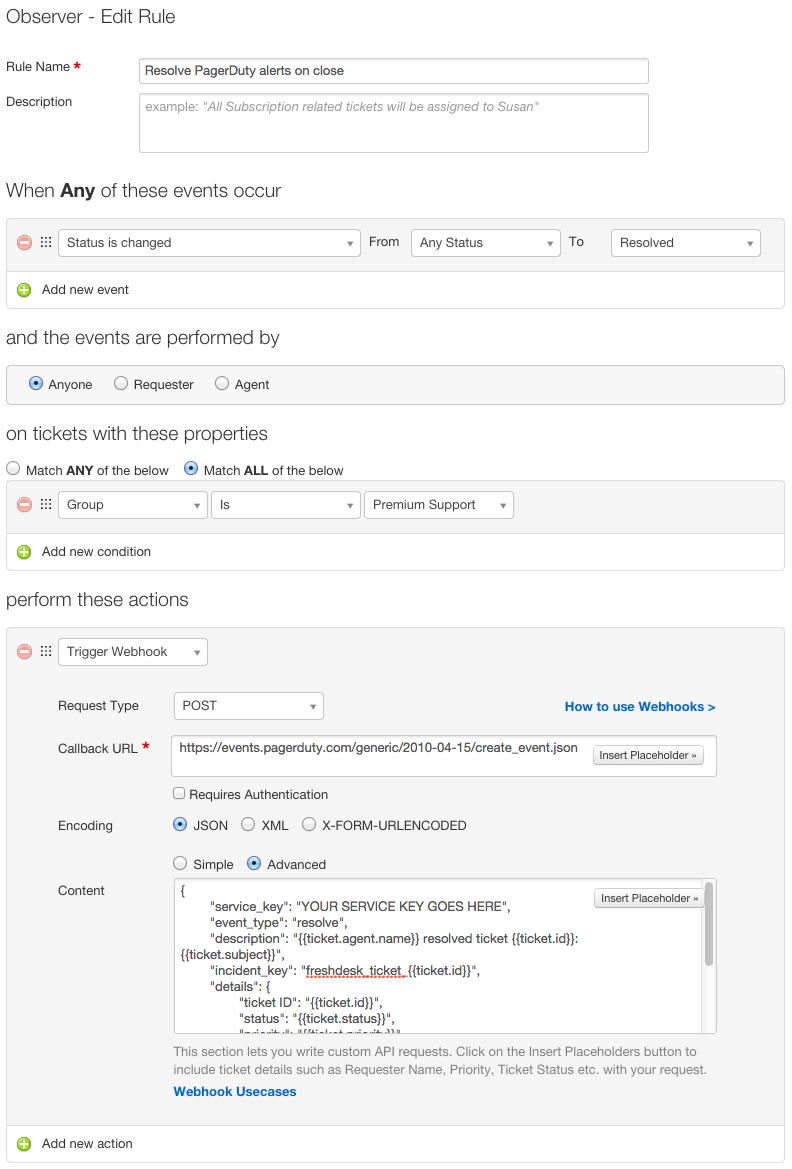
Observer Rule #1: Resolve PagerDuty alerts on close

Add an event. You’ll set:

Resolve on Close rule

Use the same Callback URL as earlier, and set the Content to:

{
    "service_key": "YOUR SERVICE KEY GOES HERE",
    "event_type": "resolve",
    "description": "{{ticket.agent.name}} resolved ticket {{ticket.id}}: {{ticket.subject}}",
    "incident_key": "freshdesk_ticket_{{ticket.id}}",
    "details": {
        "ticket ID": "{{ticket.id}}",
        "status": "{{ticket.status}}",
        "priority": "{{ticket.priority}}",
        "type": "{{ticket.ticket_type}}",
        "due by": "{{ticket.due_by_time}}",
        "requester": "{{ticket.requester.name}}",
        "requester e-mail": "{{ticket.from_email}}"
    }
}

Don’t forget that service key!

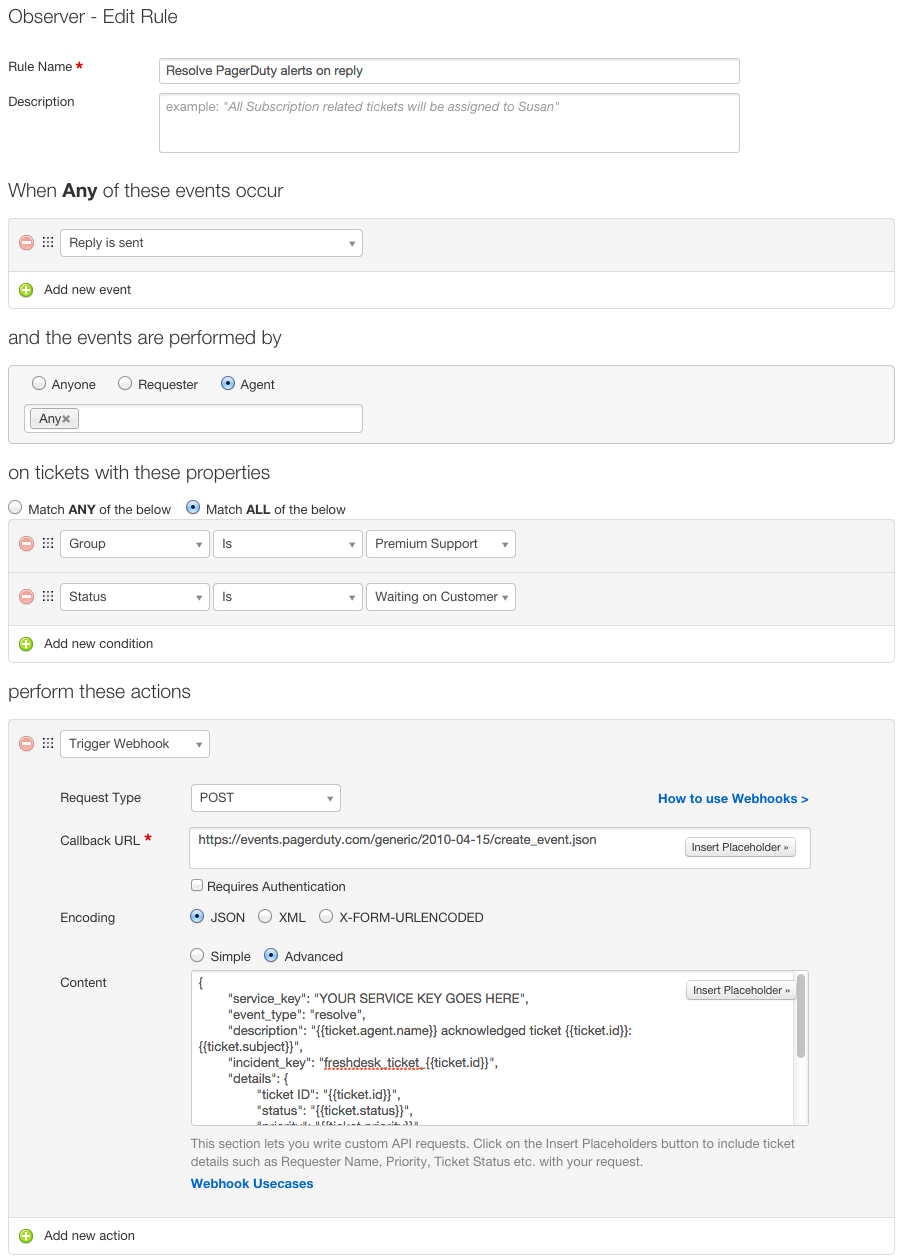
Observer Rule #2: Resolve PagerDuty alerts on agent reply

Let’s add a new event. This one will resovle your PagerDuty alert when an agent replies to it.

Resolve on Reply rule

Again, same Callback URL, with this Content (and your service key):

{
    "service_key": "YOUR SERVICE KEY GOES HERE",
    "event_type": "resolve",
    "description": "{{ticket.agent.name}} acknowledged ticket {{ticket.id}}: {{ticket.subject}}",
    "incident_key": "freshdesk_ticket_{{ticket.id}}",
    "details": {
        "ticket ID": "{{ticket.id}}",
        "status": "{{ticket.status}}",
        "priority": "{{ticket.priority}}",
        "type": "{{ticket.ticket_type}}",
        "due by": "{{ticket.due_by_time}}",
        "requester": "{{ticket.requester.name}}",
        "requester e-mail": "{{ticket.from_email}}"
    }
}

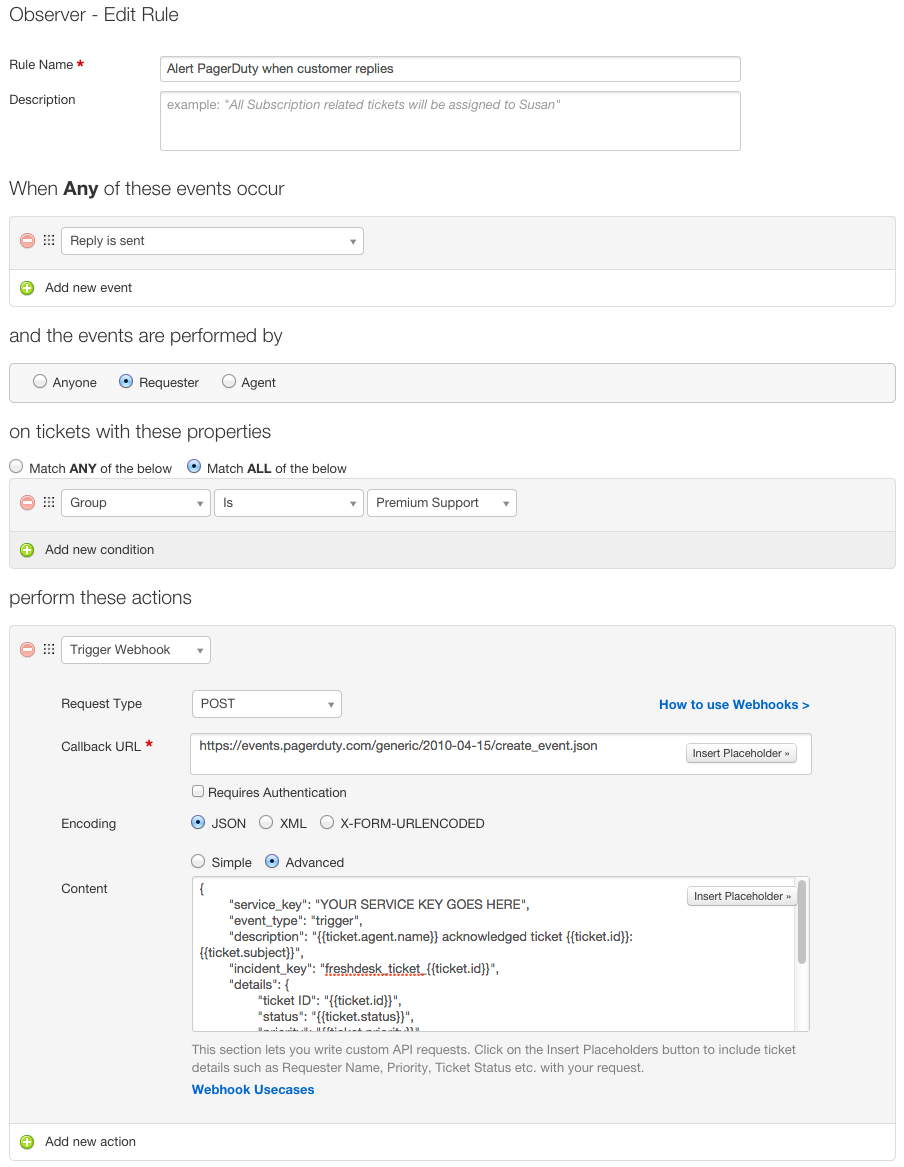
Observer Rule #3: Alert PagerDuty on customer reply

title

Here’s your Content:

{
    "service_key": "YOUR SERVICE KEY GOES HERE",
    "event_type": "trigger",
    "description": "{{ticket.agent.name}} acknowledged ticket {{ticket.id}}: {{ticket.subject}}",
    "incident_key": "freshdesk_ticket_{{ticket.id}}",
    "details": {
        "ticket ID": "{{ticket.id}}",
        "status": "{{ticket.status}}",
        "priority": "{{ticket.priority}}",
        "type": "{{ticket.ticket_type}}",
        "due by": "{{ticket.due_by_time}}",
        "requester": "{{ticket.requester.name}}",
        "requester e-mail": "{{ticket.from_email}}"
    }
}

Done!

You should now be set. Any incoming tickets that match the conditions you set in the Dispatch’r rule will be tracked by PagerDuty.

Now you have no excuse for missing those important support tickets! And your customers will thank you for it.

A new adventure begins

Act 1, Scene 1

August 23rd, 2004. A young kid, not even 21, freshly dropped out of college, passionate about open source and programming. He walks into his new office at his new job at VMware, his first job, ready to start the day, eager to impress and meet his new co-workers.

Nobody was there. Thumbs twiddled.

10AM starts to roll around, and finally, the first sign of life. Over the next couple hours, more people show up.

Over the next week, he’s set up and learning the ropes. Working on his first bug, soon his first feature. Attending his first team get-togethers. Making his first Bay Area friends.

Over the next few months, his first birthday celebration at work. His first glass of champagne. His first real responsibilities.

Over the next few years, bigger roles, leadership roles. He began to get a feel for where he’s truly going in this silly little world.

This, of course, was me, on my first adventure in the tech industry.

I was lucky to be placed in a fantastic team full of smart, hard-working, dedicated, and fun software engineers and managers. We’d discuss architecture, brainstorm ideas, joke around, watch YouTube videos, play poker, watch movies, go to events. The web of awesome people extended throughout the company as well.

Over the past nine years, I worked on a great many things.

  • Eight releases of VMware Workstation, including a three-year effort to build Workstation 8.0 (a major undertaking).
  • VMware Server 1.0. I was the primary Linux developer, pulling caffeine-fueled all nighters to meet insane deadlines.
  • Player and VMRC, which powers the VM console for our enterprise products.
  • The core foundation used in Fusion and other products.
  • Icons and artwork for the Linux products.
  • I introduced Unity to Workstation. (Sorry, guys…)
  • Helped in the creation of the current generation of the View client for Linux.
  • More recently, I developed WSX, an experiment in developing a pure web client and console for accessing remote VMs anywhere, from desktops and tablets.

Not a bad run.

This Thursday, August 1st, 2013, I’ll be leaving VMware.

Revision 1: “Add the reviewboard”

Several years ago, I began working with my good friend David Trowbridge on an open source project for keeping track of patches and easing the review process. We spent many years in the open source world looking at raw diffs on bug trackers and in e-mails, and things weren’t that much better at VMware. As Mr. Wonderful says, “There has to be a better way!”

So we slaved away in the late nights and weekends, iterating and iterating until we had something we could use. We named this product “Review Board” (or “the reviewboard,” as our first commit says). We put it out there for people to play with, if anyone was interested.

There was interest. Review Board is now used around the world at companies big and small. We’ve continued to improve and grow the product and turn it into something that developers actually want to use.

We later built a startup around this. Beanbag.

It’s dangerous to go alone. Take this.

Earlier this year, we met a local entrepreneur as part of a program we participate in. We quickly developed a rapport, and he offered to help and advise us in our efforts to grow our business. It wasn’t long after that we started discussing funding, and where that could get us.

We started pitching, and he reached out to his contacts. Before long, we had what we needed to give this a try for a couple years.

Step 3: Profit?

There’s a lot of hard work ahead of us, but we’re up to the challenge. It’s both exciting and terrifying.

Leaving my team behind at VMware is hard, but everyone has been so supportive.

IMG_0720

Basically.

In the coming months, Review Board’s going to grow in exciting new ways. We’ll be gearing up for a new 1.8 release, releasing our first commercial extension to Review Board, and improving our SaaS, RBCommons. We have a pretty good idea where we want to go from here, and now we can better focus on making it happen.

It’s going to be an awesome adventure.

Scroll to Top