CodeMirror and Spell Checking: Solved
For years I’ve wanted spell checking in CodeMirror. We use CodeMirror in our Review Board code review tool for all text input, in order to allow on-the-fly syntax highlighting of code, inline image display, bold/italic, code literals, etc.
(We’re using CodeMirror v5, rather than v6, due to the years’ worth of useful plugins and the custom extensions we’ve built upon it. CodeMirror v6 is a different beast. You should check it out, but we’re going to be using v5 for our examples here. Much of this can likely be leveraged for other editing components as well.)
CodeMirror is a great component for the web, and I have a ton of respect for the project, but its lack of spell checking has always been a complaint for our users.
And the reason for that problem lies mostly on the browsers and “standards.” Starting with…
ContentEditable Mode
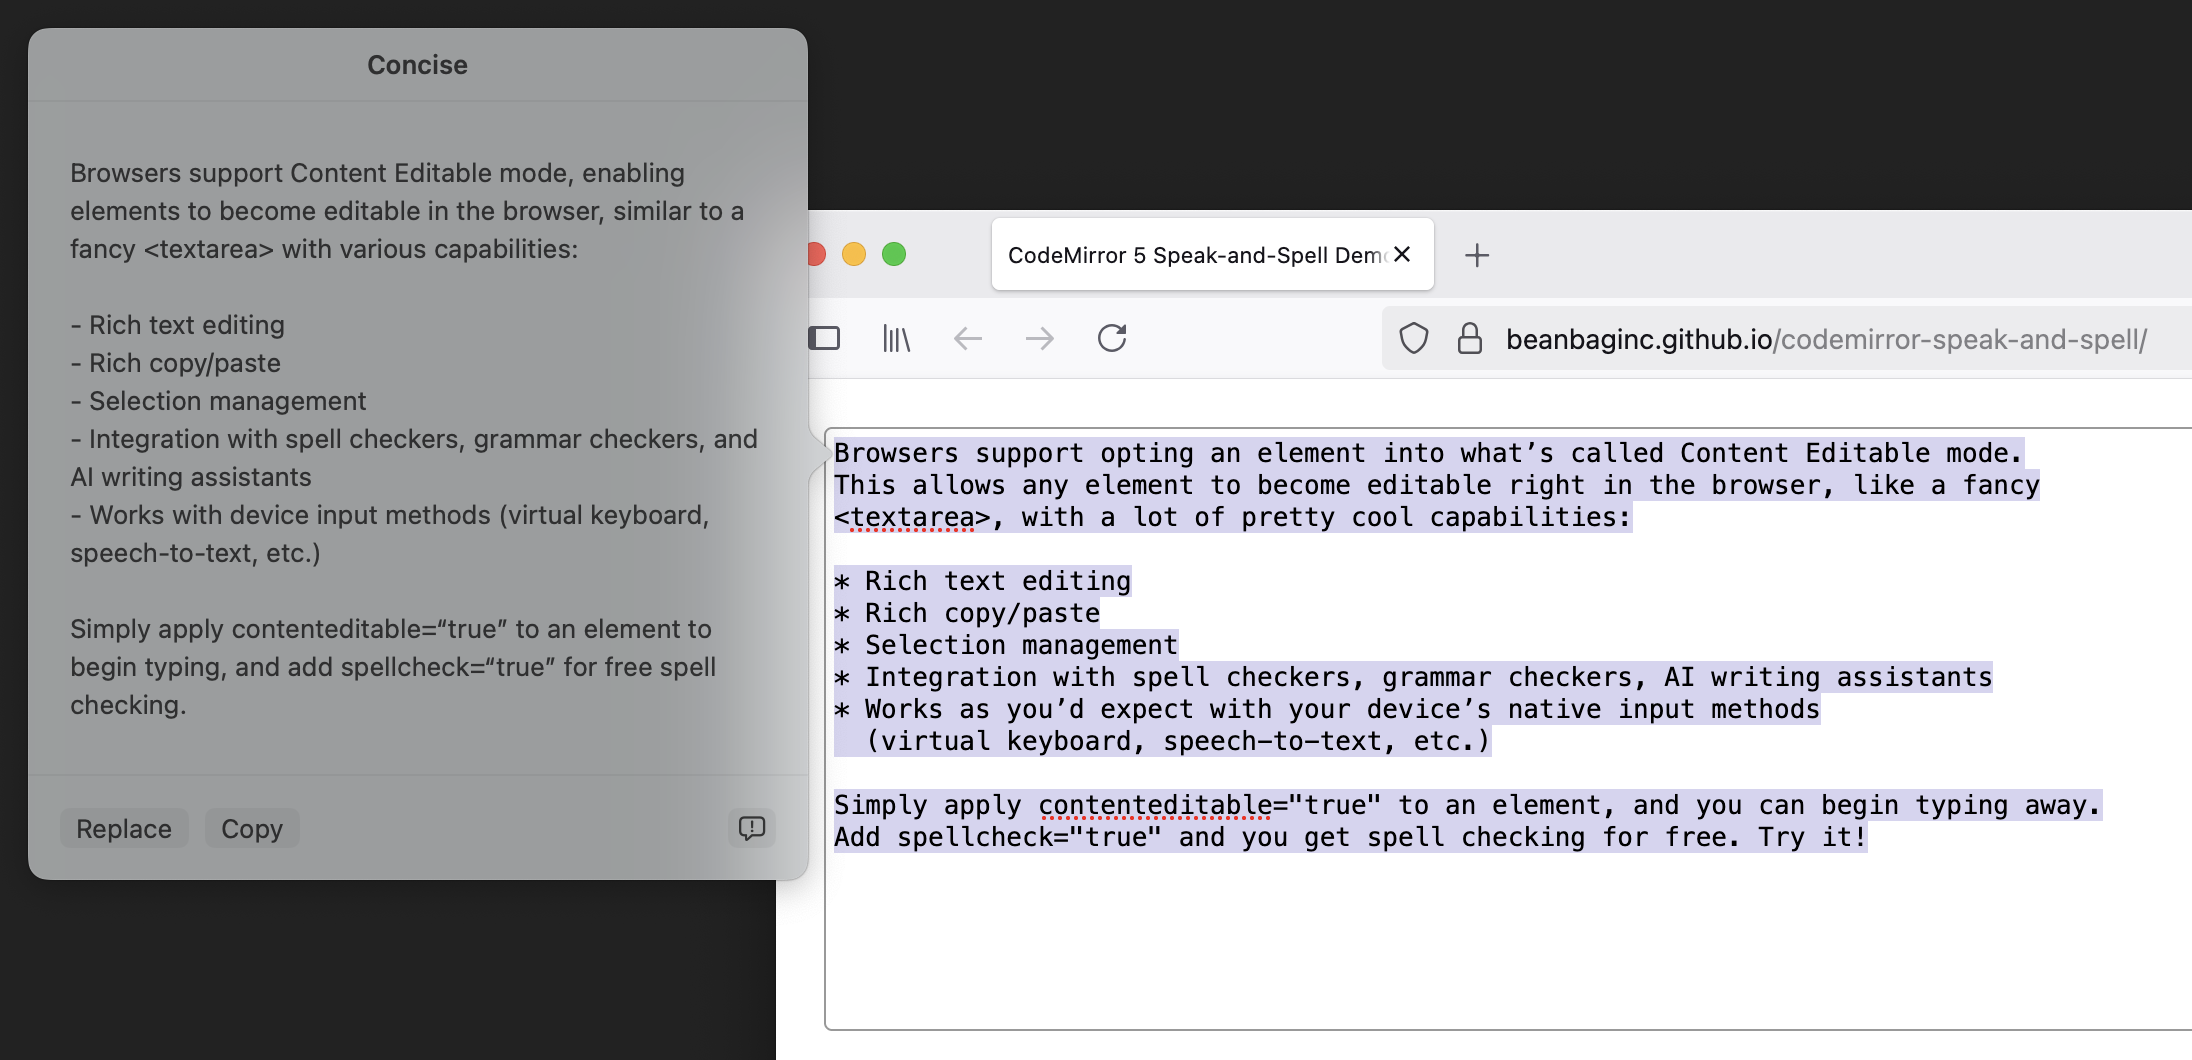
Browsers support opting an element into what’s called Content Editable mode. This allows any element to become editable right in the browser, like a fancy <textarea>, with a lot of pretty cool capabilities:
- Rich text editing
- Rich copy/paste
- Selection management
- Integration with spell checkers, grammar checkers, AI writing assistants
- Works as you’d expect with your device’s native input methods (virtual keyboard, speech-to-text, etc.)
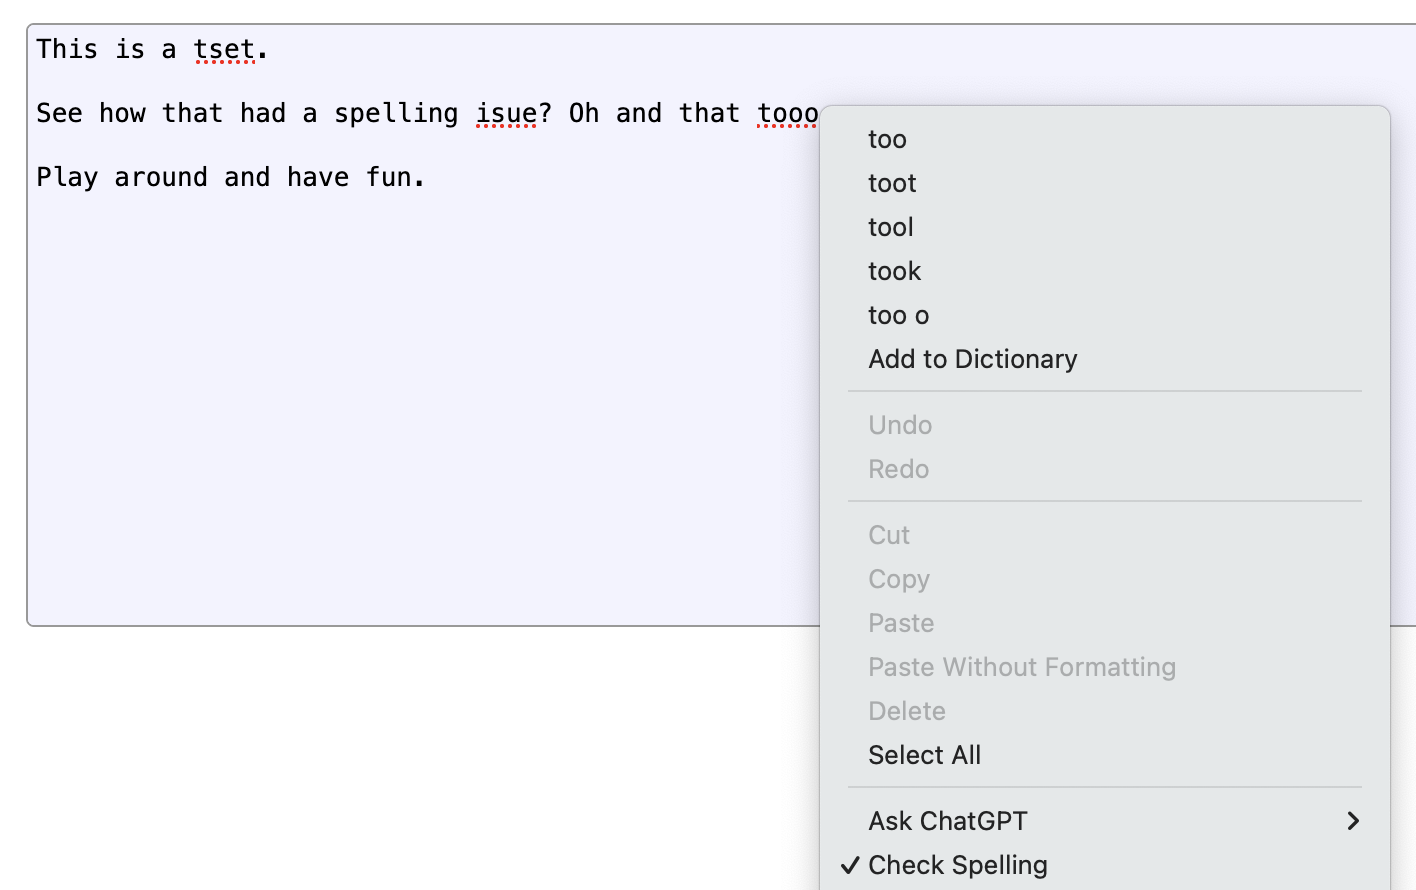
Simply apply contenteditable="true" to an element, and you can begin typing away. Add spellcheck="true" and you get spell checking for free. Try it!
And maybe you don’t even need spellcheck="true"! The browser may just turn it on automatically. But you may need spellcheck="false" if you don’t want it on. And it might stay on anyway!
Here we reach the first of many inconsistencies. Content Editable mode is complex and not perfectly consistent across browsers (though it’s gotten better). A few things you might run into include:
- Ranges for selection events and input events can be inconsistent across browsers and are full of edge cases (you’ll be doing a lot of “let me walk the DOM and count characters carefully to find out where this selection really starts” checks).
- Spell checking behaves quite differently on different browsers (especially in Chrome and Safari, which might recognize a word as misspelled but won’t always show it).
- Rich copy/paste may mess with your DOM structure in ways you don’t expect.
- Programmatic manipulating of the text content using execCommand is deprecated with no suitable replacement (and you don’t want to mess with the DOM directly or you break Undo/Redo). It also doesn’t always play nice with input events.
CodeMirror v5 tries to let the browser do its thing and sync state back, but this doesn’t always work. Replacing misspelled words on Safari or Chrome can sometimes cause text to flip back-and-forth. Data can be lost. Cursor positions can change. It can be a mess.
So while CodeMirror will let you enable both Content Editable and Spell Checking modes, it’s at your own peril.
Which is why we never enabled it.
How do we fix this?
When CodeMirror v5 was introduced, there weren’t a lot of options. But browsers have improved since.
The secret sauce is the beforeinput event.
There are a lot of operations that can involve placing new text in a Content Editable:
- Replacing a misspelled word
- Using speech-to-text
- Having AI generate content or rewrite existing content
- Transforming text to Title Case
These will generate a beforeinput event before making the change, and an input event after making the change.
Both events provide:
- The type of operation:
insertTextfor text-to-speech or newly-generated textinsertReplacementTextfor spelling replacements, AI rewrites, and other similar operations
- The range of text being replaced (or where new text will be inserted)
- The new data (either as
InputEvent.datain the form of one or moreInputEvent.dataTransferItem.items[]entries)
Thankfully, beforeinput can be canceled, which prevents the operation from going through.
This is our way in. We can treat these operations as requests that CodeMirror can fulfill, instead of changes CodeMirror must react to.
Putting our plan into action
Here’s the general approach:
- Listen to
beforeinputon CodeMirror’s input element (codemirror.display.input.div). - Filter for the following
InputEvent.inputTypevalues:'insertReplacementText','insertText'. - Fetch the ranges and the new plain text data from the
InputEvent. - For each range:
- Convert each range into a start/end line number within CodeMirror, and a start/end within each line.
- Issue a
CodeMirror.replaceRange()with the normalized ranges and the new text.
Simple in theory, but there’s a few things to get right:
- Different browsers and different operations will report those ranges on different elements. They might be text nodes, they might be a parent element, or they might be the top-level
contenteditableelement. Or a combination. So we need to be very careful about our assumptions. - We need to be able to calculate those line numbers and offsets. We won’t necessarily have that information up-front, and it depends on what nodes we get in the ranges.
- The text data can come from more than one place:
- An
InputEvent.dataattribute value - One or more strings accessed asynchronously from
InputEvent.dataTransfer.items[], in plain text, HTML, or potentially other forms.
- An
- We may not have all of this! Even as recently as late-2024, Chrome wasn’t giving me target ranges in
beforeinput, only ininput, which was too late. So we’ll want to bail if anything goes wrong.
Let’s put this into practice. I’ll use TypeScript to help make some of this a bit more clear, but you can do all this in JavaScript.
Feel free to skip to the end, if you don’t want to read a couple pages of TypeScript.
1. Set up our event handler
We’re going to listen to beforeinput. If it’s an event we care about, we’ll grab the target ranges, take over from the browser (by canceling the event), and then prepare to replay the operation using CodeMirror’s API.
This is going to require a bit of help figuring out what lines and columns those ranges correspond to, which we’ll tackle next.
const inputEl = codeMirror.display.input.div;

inputEl.addEventListener('beforeinput',
                         (evt: InputEvent) => {
    if (evt.inputType !== 'insertReplacementText' &&
        evt.inputType !== 'insertText') {
        /*
         * This isn't a text replacement or new text event,
         * so we'll want to let the browser handle this.
         *
         * We could just preventDefault()/stopPropagation()
         * if we really wanted to play it safe.
         */
        return;
    }

    /*
     * Grab the ranges from the event. This might be
     * empty, which would have been the case on some
     * versions of Chrome I tested with before. Play it
     * safe, bail if we can't find a range.
     *
     * Each range will have an offset in a start container
     * and an offset in an end container. These containers
     * may be text nodes or some parent node (up to and
     * including inputEl).
     */
    const ranges = evt.getTargetRanges();

    if (!ranges || ranges.length === 0) {
        /* We got empty ranges. There's nothing to do. */
        return;
    }

    const newText =
           evt.data
        ?? evt.dataTransfer?.getData('text')
        ?? null;

	if (newText === null) {
		/* We couldn't locate any text, so bail. */
        return;
	}

    /*
     * We'll take over from here. We don't want the browser
     * messing with any state and impacting CodeMirror.
     * Instead, we'll run the operations through CodeMirror.
     */
    evt.preventDefault();
    evt.stopPropagation();

    /*
     * Place the new text in CodeMirror.
     *
     * For each range, we're getting offsets CodeMirror
     * can understand and then we're placing text there.
     *
     * findOffsetsForRange() is where a lot of magic
     * happens.
     */
    for (const range of state.ranges) {
        const [startOffset, endOffset] =
            findOffsetsForRange(range);

        codeMirror.replaceRange(
            newText,
            startOffset,
            endOffset,
            '+input',
        );
    }
});
This is pretty easy, and applicable to more than CodeMirror. But now we’ll get into some of the nitty-gritty.
2. Map from ranges to CodeMirror positions
Most of the hard work really comes from mapping the event’s ranges to CodeMirror line numbers and columns.
We need to know the following:
- Where each container node is in the document, for each end of the range.
- What line number each corresponds to.
- What the character offset is within that line.
This ultimately means a lot of traversing of the DOM (we can use TreeWalker for that) and counting characters. DOM traversal is an expense we want to incur as little as possible, so if we’re working on the same nodes for both end of the range, we’ll just calculate it once.
function findOffsetsForRange(
    range: StaticRange,
): [CodeMirror.Position, CodeMirror.Position] {
    /*
     * First, pull out the nodes and the nearest elements
     * from the ranges.
     *
     * The nodes may be text nodes, in which case we'll
     * need their parent for document traversal.
     */
    const startNode = range.startContainer;
    const endNode = range.endContainer;

    const startEl = (
        (startNode.nodeType === Node.ELEMENT_NODE)
        ? startNode as HTMLElement
        : startNode.parentElement);
    const endEl = (
        (endNode.nodeType === Node.ELEMENT_NODE)
        ? endNode as HTMLElement
        : endNode.parentElement);

    /*
     * Begin tracking the state we'll want to return or
     * use in future computations.
     *
     * In the optimal case, we'll be calculating some of
     * this only once and then reusing it.
     */
    let startLineNum = null;
    let endLineNum = null;
    let startOffsetBase = null;
    let startOffsetExtra = null;
    let endOffsetBase = null;
    let endOffsetExtra = null;

    let startCMLineEl: HTMLElement = null;
    let endCMLineEl: HTMLElement = null;

    /*
     * For both ends of the range, we'll need to first see
     * if we're at the top input element.
     *
     * If so, range offsets will be line-based rather than
     * character-based.
     *
     * Otherwise, we'll need to find the nearest line and
     * count characters until we reach our node.
     */
    if (startEl === inputEl) {
        startLineNum = range.startOffset;
    } else {
        startCMLineEl = startEl.closest('.CodeMirror-line');
        startOffsetBase = findCharOffsetForNode(startNode);
        startOffsetExtra = range.startOffset;
    }

    if (endEl === inputEl) {
        endLineNum = range.endOffset;
    } else {
        /*
         * If we can reuse the results from calculations
         * above, that'll save us some DOM traversal
         * operations. Otherwise, fall back to doing the
         * same logic we did above.
         */
        endCMLineEl =
            (range.endContainer === range.startContainer &&
             startCMLineEl !== null)
            ? startCMLineEl
            : endEl.closest(".CodeMirror-line");

        endOffsetBase =
            (startEl === endEl && startOffsetBase !== null)
            ? startOffsetBase
            : findCharOffsetForNode(endNode);
        endOffsetExtra = range.endOffset;
    }

    if (startLineNum === null || endLineNum === null) {
        /*
         * We need to find the line numbers that correspond
         * to either missing end of our range. To do this,
         * we have to walk the lines until we find both our
         * missing line numbers.
         */
        for (let i = 0;
             (i < children.length &&
              (startLineNum === null || endLineNum === null));
             i++) {
            const child = children[i];

            if (startLineNum === null &&
                child === startCMLineEl) {
                startLineNum = i;
            }

            if (endLineNum === null &&
                child === endCMLineEl) {
                endLineNum = i;
            }
        }
    }

    /*
     * Return our results.
     *
     * We may not have set some of the offsets above,
     * depending on whether we were working off of the
     * CodeMirror input element, a text node, or another
     * parent element. And we didn't want to set them any
     * earlier, because we were checking to see what we
     * computed and what we could reuse.
     *
     * At this point, anything we didn't calculate should
     * be 0.
     */
    return [
        {
            ch: (startOffsetBase || 0) +
                (startOffsetExtra || 0),
            line: startLineNum,
        },
        {
            ch: (endOffsetBase || 0) +
                (endOffsetExtra || 0),
            line: endLineNum,
        },
    ];
}


/*
 * The above took care of our line numbers and ranges, but
 * it got some help from the next function, which is designed
 * to calculate the character offset to a node from an
 * ancestor element.
 */
function findCharOffsetForNode(
    targetNode: Node,
): number {
    const targetEl = (
        targetNode.nodeType === Node.ELEMENT_NODE)
        ? targetNode as HTMLElement
        : targetNode.parentElement;
    const startEl = targetEl.closest('.CodeMirror-line');
    let offset = 0;

    const treeWalker = document.createTreeWalker(
        startEl,
        NodeFilter.SHOW_ELEMENT | NodeFilter.SHOW_TEXT,
    );

    while (treeWalker.nextNode()) {
        const node = treeWalker.currentNode;

        if (node === targetNode) {
            break;
        }

        if (node.nodeType === Node.TEXT_NODE) {
            offset += (node as Text).data.length;
        }
    }

    return offset;

}
Whew! That’s a lot of work.
CodeMirror has some similar logic internally, but it’s not exposed, and not quite what we want. If you were working on making all this work with another editing component, it’s possible this would be more straight-forward.
What does this all give us?
- Spell checking and replacements without (nearly as many) glitches in browsers
- Speech-to-text without CodeMirror stomping over results
- AI writing and rewriting, also without risk of lost data
- Transforming of text through other means.
Since we took the control away from the browser and gave it to CodeMirror, we removed most of the risk and instability.
But there are still problems. While this works great on Firefox, Chrome and Safari are a different story. Those browsers are bit more lazy when it comes to spell checking, and even once it’s found some spelling errors, you might not see the red squigglies. Typing, clicking around, or forcing a round of spell checking might bring them back, but might not. But this is their implementation, and not the result of the CodeMirror integration.
Ideally, spell checking would become a first-class citizen on the web. And maybe this will happen someday, but for now, at least there are some workarounds to get it to play nicer with tools like CodeMirror.
We can go further
There’s so much more in InputEvent we could play with. We explored the insertReplacementText and insertText types, but there’s also:
insertLinkinsertFromDropinsertOrderedListformatBoldhistoryUndo
And so many more.
These could be integrated deeper into CodeMirror, which may open some doors to a far more native feel on more platforms. But that’s left as an exercise to the reader (it’s pretty dependent on your CodeMirror modes and the UI you want to provide).
There are also improvements to be made, as this is not perfect yet (but it’s close!). Safari still doesn’t recognize when text is selected, leaving out the AI assisted tools, but Chrome and Firefox work great. We’re working on the rest.
Give it a try
You can try our demo live in your favorite browser. If it doesn’t work for you, let me know what your browser and version are. I’m very curious.
We’ve released this as a new CodeMirror v5 plugin, CodeMirror Speak-and-Spell (NPM). No dependencies. Just drop it into your environment and enable it on your CodeMirror editor, like so:
const codeMirror = new CodeMirror(element, {
  inputStyle: 'contenteditable',
  speakAndSpell: true,
  spellcheck: true,
});
CodeMirror v6 will come in the future, but probably not until we move to v6 (and we’re waiting on a lot of the v5 world to migrate over first).
CodeMirror and Spell Checking: Solved Read More »